
TLDR
Use Jenkinsfile instead of the UI so that one ahem well-intentioned person can’t ruin your build.
Resources
by Wes Higbee—serious shout-out to this guy. His classes are perfect - very thorough and clear.
DevOps, Version Control, and Jenkinsfile
For real, though, one of the things I like most about DevOps principles is version control. Well, honestly, I have a love-hate relationship with it because Git still makes me sweat every time I do a pull request.
Nonetheless, all DevOps starts with version control! It envelopes what Chef calls the coded business, which includes the concepts of infrastructure as code, pipeline as code, testing, etc. The end result being total automation. Therefore, if you’re trying out a product and can’t make it do what you want it to do with code, then you should stop using it and find something else.
So when you’re creating a CI/CD Pipeline in Jenkins, I’m going to try to convince you to create the build using Jenkinsfile instead of the UI so that it is subject to your change control mechanisms already in place (source control) and so that one very well-intentioned person doesn’t ruin your build.
Pipelines
In super-simple terms, let me share with you my understanding of a Pipeline in Jenkins. While a job is a defined process, and a build is the result of that job being carried out, a pipeline is a defined series of jobs that can be interrupted in between processes by different events such as failed tests, approval, et al.
So when we use a Jenkinsfile which is written in Groovy for Jenkins’s Pipeline plugin, we’re able to do a lot of things that you can’t do if you’re just creating a bunch of builds in the UI. I’ll show you a sample, and then I’ll tell you what I mean by that.
Sample
Right now I’m working on a build for Michael’s dotnet core application. The Jenkinsfile code below is going to do this:
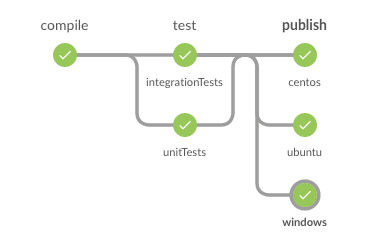
Let’s take a look at the code stage by stage.
compile
#!/usr/bin/env groovy

stage('compile') {
  node {
    checkout scm
    stash 'everything'
    dir('src/cafe') {
      bat 'dotnet restore'
      bat "dotnet build --version-suffix ${env.BUILD_NUMBER}"
    }
  }
}
In the compile stage, we’re building the dotnet core application. First, we need to declare our stage
with stage('compile'). After that we’re going to define what happens within our node. Now this gets super confusing to
me because of the vernacular. We throw around words that mean different things in different contexts, and that totally
doesn’t work for me. Nonetheless, what I think it means is that everything that happens within the node block is
considered a build step (at least in the context that I mention above) that will be given to an executor to carry out
serially within the stage.
The executor will then check our code out from source code and stash all the info that we need for later stages. Then
we’re going to go to run dotnet restore from the src/cafe directory to get all the dependent packages to get
ready to build. After that, it’s going to rundotnet build, and then we have a compiled application!
test
stage('test') {
    parallel unitTests: {
      test('Test')
    }, integrationTests: {
      test('IntegrationTest')
    },
    failFast: false
}

def test(type) {
  node {
    unstash 'everything'
    dir("test/cafe.${type}") {
        bat 'dotnet restore'
        bat 'dotnet test'
    }
  }
}
Now here in the test stage we’re going to run parallel stages. That means that we want them to run at the same time,
so if that’s going to happen, then we need two different executors to do that. You can select how many executors (or
worker bees, as Wes calls them) you have, but there are two by default. That’s perfect for
us, because we have just two parallel stages to run, unitTests and integrationTests.
You’ll see there that I decided to define a method instead of writing out the whole thing since the only thing that changes from stage to stage is the test type. So it’s helpful for me to look and see what the method is defining first, and then go up and look at how it’s called.
As you can see in the method, first we’re going to unstash 'everything' that we stashed in the compile stage. The
reason that we’re doing that is because we could possibly be running this stage on a different node than the one from
which we checked out our source, so the files from the repo may not be there. But the master knows where you stashed it
to begin with in that Pipeline job.
Then we’re going to restore it (get all the dependencies loaded that we need) and then run the test. And that’ll
happen for each test type that we called simultaneously.
publish
stage('publish') {
  parallel windows: {
    publish('win10-x64')
  }, centos: {
    publish('centos.7-x64')
  }, ubuntu: {
    publish('ubuntu.16.04-x64')
  }
}

def publish(target) {
  node {
    unstash 'everything'
    dir('src/cafe') {
      bat "dotnet publish -r ${target}"
      archiveArtifacts "bin/Debug/netcoreapp1.1/${target}/publish/*.*"
    }
  }
}
And finally we come to the publish stage. Here we’re running three parallel stages using another method definition, so
we’ll actually need three executors. If we only have two to begin with, that’s okay because the third one will just get
in line and run after. If you’ll look down at the publish(target) method, you can see that we’re unstashing in each
stage again. And from the same directory as before we’ll publish the application to a specified platform. After
that, archiveArtifacts makes that application available on the Jenkins server for you to do what you want with it.
What you can’t do in the UI
The UI is a typical UI, right. It’s there to help make some of the decisions for you. It wants to make your life easier, but everything in life is a tradeoff, so you have to sacrifice some functionality.
- You can’t run parallel commands in the UI, just sequential.
- You can’t commit it to version control and have an approval and promotion process in the UI.
- You can’t know what changes were made in the Pipeline.
The beauty of creating your Jenkinsfile for the Pipeline plugin is that you can manipulate it exactly the way that you want it. You have way more control and options than in the UI alone. The benefits that they make note of on their website are:
- Code review/iteration on the Pipeline
- Audit trail for the Pipeline
- Single source of truth for the Pipeline, which can be viewed and edited by multiple members of the project.
Concluding Thoughts
I told you in my last post that I’ve set a training plan for myself this coming year, and Jenkins was at the top of the list. And it’s another one of those technologies that creates an inverted learning environment for me, as I touched on in my last post. The more I discover these technologies, the more encouraging it is to me that I don’t have to know everything about everything to be able to add value. I can take something like Jenkins and learn a little about every aspect of deployment by creating builds. There are many learning opportunities wrapped up in technologies like this. More to come about inverted learning. My interest is piqued!