
On Monday, I gave you some basic tips about working with Terraform in Azure, and today I want to show you what I’ve learned about creating virtual machines from custom images.
First of all, there are a lot of ways in which you can create your image, Packer being a great option, but I’m just going to show you the simple, manual way because I think it gives you a good idea of what’s happening. Then we’re going to build a virtual machine in Terraform from that image.
The basic outline
- Create Source VM
- Deprovision / Sysprep
- Deallocate
- Generalize
- Create Image
- Create Virtual Machine with Terraform
1. Create your Source Virtual Machine
This is totally up to you. Provision this bad boy however you want. Just know that you’re not going to actually use this
machine, just use it to make an image from it. Also, this post is about creating a VM with unmanaged disks,
so if you want to follow along, you’ll need to specify --use-unmanaged-disk in the az vm create command or in the
Azure Portal. Default is to use managed disks, so be aware.
Make sure you note what your osdisk name is. You’ll need this later.
As of today, there is an issue with creating a VM from a user image with managed disks. I hope to write another post when the issue is resolved to tell you how to create that.
2. Deprovision or Sysprep your Source Virtual Machine
Whether you’re making a Linux or Windows image, the steps are generally the same. For Linux, you’ll deprovision your machine, and for Windows, you’ll Sysprep it.
Linux: There’s an Azure agent on
your Linux called waagent, and we’re going to use that to deprovision that machine. Deprovisioning it means that we’re
going to use that agent to delete files and data. To deprovision your Linux machine, SSH to your machine.
When you’re in, simply run sudo waagent -deprovision+user. If you don’t want to type y, giving it permission to
continue, then you can add -force to avoid the confirmation step. After that, exit to exit your SSH
session. A little note from Microsoft documentation:
Only run this command on a VM that you intend to capture as an image. It does not guarantee that the image is cleared of all sensitive information or is suitable for redistribution. The +user parameter also removes the last provisioned user account. If you are baking account credentials in to the VM, use -deprovision to leave the user account in place.
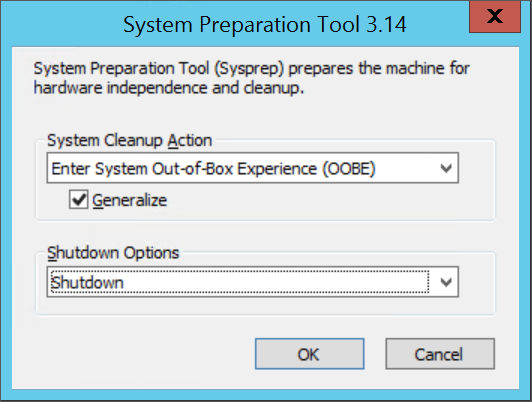
Windows: Sysprep gets a machine ready for be used as an image by deleting personal account information, among other things. To Sysprep your Windows machine, sign in to your Windows
VM. Navigate to %windir%\system32\sysprep (whether it be in the Command Prompt or just in Explorer) and run sysprep.exe. When the System Preparation Tool dialog box pops up, select Enter System Out-of-Box Experience (OOBE), and make sure that the Generalize check box is selected. And Shutdown Options should be Shutdown because we want it to shut down when it’s finished sysprepping.
3. Deallocate your Source Virtual Machine
Now we have to deallocate that machine. This means that we’re not only stopping the machine, but we’re also deleting its
public and internal IP. When a machine is deallocated, it no longer incurs charges. To do this, you need to
be logged into your Azure account (az login). After that, you can run:
az vm deallocate --resource-group <ResourceGroupName> --name <SourceVirtualMachineName>
4. Generalize your Source Virtual Machine
Once your machine is deallocated, it’s ready to be generalized, the final step before creating your image. (If you’ve created your source virtual machine with Packer, then it has already generalized your machine, so this step is unnecessary.)
az vm generalize --resource-group <ResourceGroupName> --name <SourceVirtualMachineName>
5. Create your Image
Alas, we’re ready to create your image from which you’ll clone machines. Go ahead and run (please note, now, that name refers to the image and not the VM):
az image create --resource-group <ResourceGroupName> --name <ImageName> --source <SourceVirtualMachineName>
A good note from Microsoft:
The image is created in the same resource group as your source VM. You can create VMs in any resource group within your subscription from this image. From a management perspective, you may wish to create a specific resource group for your VM resources and images.
6. Terraform it up
Now for the fun stuff! Okay, so we have our image sitting there in our resource group, and now we have a couple of options. If we want to use managed disks (after the issue is resolved), then we can use an image from one resource group and create a VM in another resource group (but still in the same subscription).
For this example, as I said, though, I’m going to use unmanaged
disks. This example
is nice and easy to walk through because it does exactly what we’re wanting to do. Let’s take a look at
the azurerm_virtual_machine block of
the main.tf.
resource "azurerm_virtual_machine" "vm" {
  name                  = "${var.hostname}"
  location              = "${var.location}"
  resource_group_name   = "${azurerm_resource_group.rg.name}"
  vm_size               = "${var.vm_size}"
  network_interface_ids = ["${azurerm_network_interface.nic.id}"]

  storage_os_disk {
    name          = "${var.hostname}-osdisk1"
    image_uri     = "${var.image_uri}"
    vhd_uri       = "https://${var.storage_account_name}.blob.core.windows.net/vhds/${var.hostname}-osdisk.vhd"
    os_type       = "${var.os_type}"
    caching       = "ReadWrite"
    create_option = "FromImage"
  }

  os_profile {
    computer_name  = "${var.hostname}"
    admin_username = "${var.admin_username}"
    admin_password = "${var.admin_password}"
  }

  os_profile_linux_config {
    disable_password_authentication = false
  }
}
First of all, if you’re comparing this VM block to building
a virtual machine not from an image you’ll
notice that we’re missing a storage_image_reference block. This is neglected because the image provides that
information. On the other hand, vm_size is required, and it must be the same size as the image.
In the storage_os_disk block the two things we’ll look at are the image_uri and the vhd_uri.
image_uri
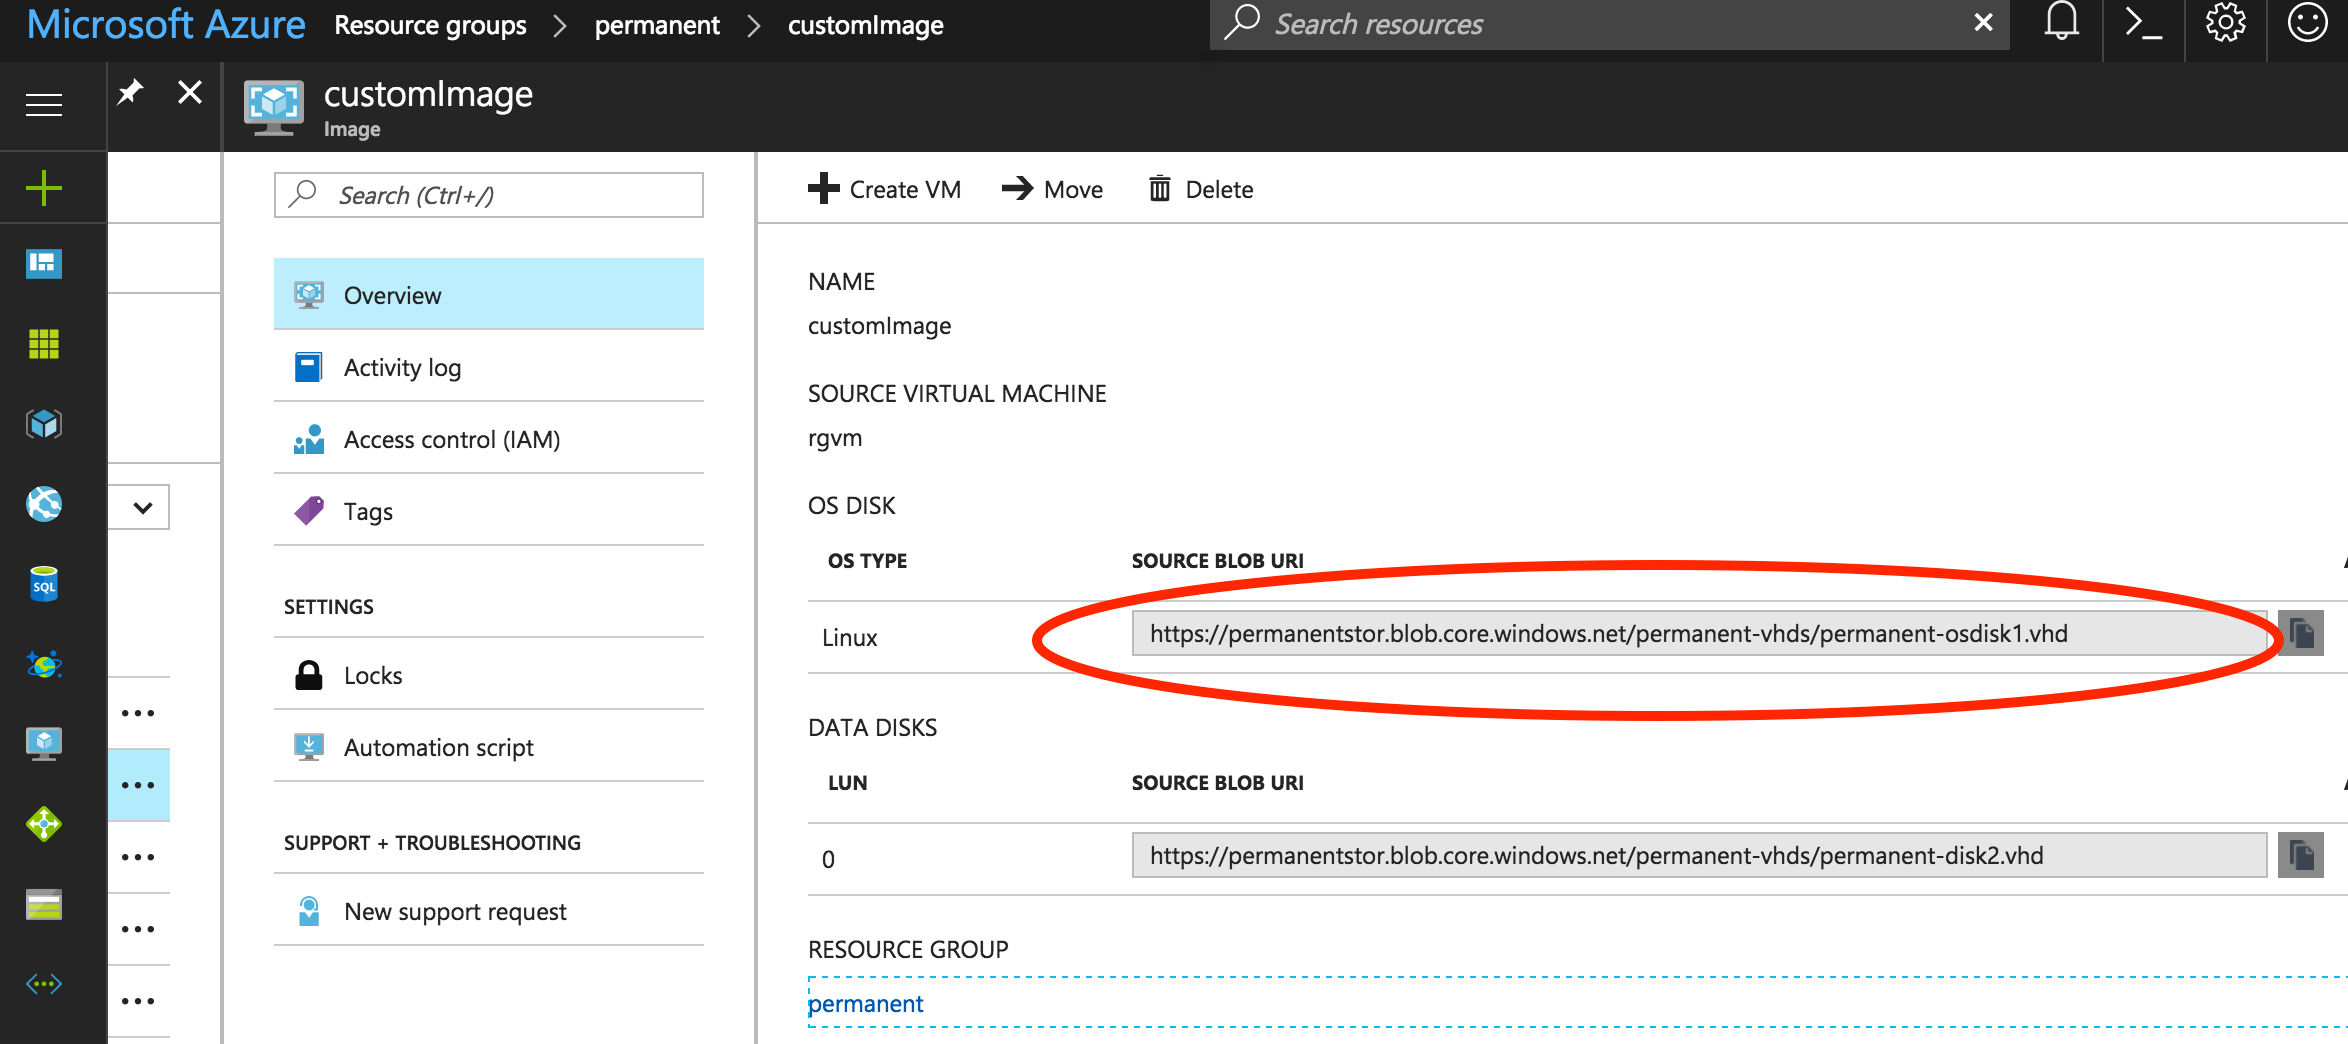
The image that you just made has a VHD, and you need the uri to this VHD. There are a couple
of ways to find out the image_uri. First, you can simply look in the portal. You can see in the screenshot below that
I have a resource group called permanent with an image called customImage. In the overview of the image resource, I
can see the Source Blob Uri that I need.
Another way I can find that is to use Azure CLI 2.0 to find out the names of my resource group (az group list), storage account (az resource list -g [ResourceGroupName] -o table), and os disk (if you’re not using managed disks, then I don’t know of a command to find this name—create an issue if you do, so I hope you saved it from when you created it). If I have those things, then I can build the uri like this:
https://<StorageAcctName>.blob.core.windows.net/vhds/<osdiskName>.vhd
The only change would be if you changed the default name of the vhds directory. Otherwise, this should work.
vhd_uri
Since this example does not have us using managed disks, we’re going to have to put our new vhd into our existing
storage account. Therefore, the storage_account_name variable that you see there is for the existing storage account
in which your image’s vhd resides (the one we used for the image_uri).
And that’s it! If you want to create a VM with managed disks, it’s not too different, but I’ll show you after that issue gets resolved. You can also check out these other examples of creating VMs from images:
Concluding Thoughts
Having some foresight into this entire process before you get started will help you along the way in creating virtual machines from this image. It will cause you to carefully consider disk type, where to store everything, resource group structure, etc. as opposed to flying by the seat of your pants (which will most likely result in you starting over— trust me). Having this high level view of the process will really simplify it for you. So I hope this helps! Happy Terraforming!
In case you missed it…here’s my post on tips for working with Terraform in Azure.